Agvance SKY Energy is currently only available to Agvance customers.
Energy Force customers should continue to add tanks in Energy Force, not through Agvance SKY Energy at this time.
To add a new tank from Agvance SKY Energy without redirecting back to Agvance Windows, a Company Admin will need to enable the User Role permission for Add/Edit Tank found by selecting the Edit icon in Agvance SKY Admin under the Role tab. Select Edit from the grid on the Tanks page or on the Tank Information page to edit that Tank's information.
Note: Shared Agvance and Energy Force customers do not have the ability to Add Tank or Edit and Delete Tanks from Agvance SKY Energy. A notification on the Daily Fuel page states SKY Energy is currently showing Agvance Data only. Even if the Admin / Feature for Add/Edit Tank is enabled, being a shared customer the action will be disabled.
Open Agvance SKY Energy / Tanks and navigate to the New Tank addition page by hovering over the blue + icon and select New Tank.
On the New Tank addition page, all fields will appear on open and sections expanded. The left navigation tree expands view upon hover and choosing a section will jump to that area of the form.

Tank Profile
Choose the appropriate Location (Location ID) from the drop-down. Start typing in this field to narrow down results.

- Location – The Location name with Location ID below must be selected in order for Add Customer to appear active on the form.
Note: If fields are filled out before Location selection or Location selection changes, changes will remain unless the change is a Customer or Product. - Add Customer – Filter and choose the Customer/Owner from a list and choose Select & Close.
- Energy Billing Splits – Splits used for invoicing deliveries. When editing a Tank choose multiple Customers (Up to 8 Customers can be included in a split on a tank.) and allocate the Split (%) for each. Total must equal 100% for all in the Total Split % field. Remove or change customers by selecting Remove or + Add Customer in the Energy Billing Splits section.
Note: Splits do not show on the summary/collapsed view.- When viewing Tank Information, select the Customer Name and the system will route to the Customer page. Select the View link under Customer Attachments to view Customer attachments.
- Rental Billing Splits – Splits used for posting rent/lease invoices. When editing a Tank, Customer Names will populate from the Energy Billing Splits section, but can be edited by selecting Remove or + Add Customer or choose to check the Same as Energy Billing Splits box to keep the same customers and Split (%). Total must equal 100% for all in the Total Split % field.
- When viewing Tank Information, select the Customer Name and the system will route to the Customer page. Select the View link under Customer Attachments to view Customer attachments.
- Billing Comments – Optionally enter comments relating to the billing of the Tank. Comments entered here will be visible to the customer.
- Description – Provide more detailed information relating to the Tank.
- Owner – This field populates when the Customer is added but can be changed.
- Serial Number – Enter the required serial number for the tank being added or edited. When saving, Agvance SKY Energy will validate the new number.
- Tank Size – Enter the required Tank size.
- Salesperson – Preset on both Add and Edit Tank forms, selecting in this autocomplete field populates a list of Salespeople to choose from. Alternatively, type a Name or ID in field to search.
- Add Product – Select Add Product to choose from a list of all Products is available in Agvance SKY Energy. The list can be narrowed down by selecting the Filter icon and entering a filter criteria by Department ID or Name, Product Name or ID, Location or Classification or search in the Search Customers bar located in the header. When typing, the grid will populate based on the text entered. Choose the Ellipsis at the top to Reset Grid from filtering or Autofit Columns.
 |
 |
Delivery

- Route, Region and Driver – Choose the appropriate Route, Region, and Driver from the drop-downs. Start typing in this field to narrow down results.
Note: Inactive Drivers should not display. Drivers in the list will only be drivers with email addresses so Orders can be emailed. This rule is set up in Agvance Windows. - Must Be First Stop – Optionally check Must Be First Stop if this Tank should be routed first.
- Address, City, State, Zip – Enter the Tank Address, City, State/Province and Zip.
- Latitude/Longitude – Enter the Latitude and Longitude Tank location details when adding/editing a Tank or choose Plot Tank to plot the Tank on the map. When selecting Plot Tank, the Zoom to Address field returns the top 5 suggestions (US and Canada addresses only) based on what is typed. Select from these suggestions to zoom the map to the relevant location. When editing a Tank, select Move Tank to make adjustments to the Latitude and Longitude.

- Latitude field
- -90 to + 90 (up to 6 decimal places/8 characters total - numeric)
- Longitude field
- -180 to +180 (up to 6 decimal places/9 characters total - numeric)
- Latitude field
- Directions – Enter Directions to the Tank that will be visible on Work Orders and Product Delivery Orders.

Usage
- Delivery Type – Choose one of the following selections from the drop-down.
- Scheduled Delivery
- K-Factor – Enter the required K-Factor for this Delivery Type.
- Heating Usage Factor – Read-only field that updates from the K-factor.
- Last Delivery Date – Select the last date of delivery from the calendar that will determine with the next delivery date is due.
- Last Delivery Gauge – Input the amount on the gauge from the last delivery up to 100%.
- Last Delivery Amount – Enter the amount from the last delivery.
- Last Delivery Truck Ticket – Enter the Truck Ticket number from the last delivery.
- Update K-Factor – Optionally select to update the K-Factor.

- Calendar Days
- K-Factor – Not required.
- Last Delivery Date – Select the last date of delivery from the calendar that will determine with the next delivery date is due.
- Last Delivery Gauge – Input the amount on the gauge from the last delivery.
- Last Delivery Amount – Enter the amount from the last delivery.
- Last Delivery Truck Ticket – Enter the Truck Ticket number from the last delivery.
- Update K-Factor – Optionally select to update the K-Factor.
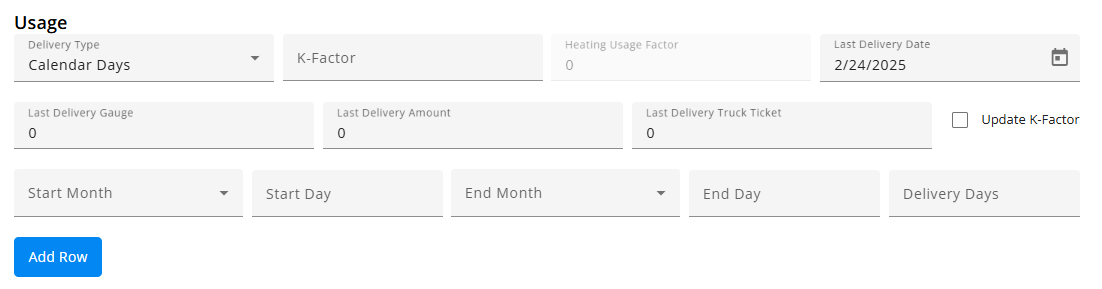
- A Calendar Days section and table will be added to the bottom of the Delivery Type section.
- Enter information for each Calendar Day delivery the Start Month, Start Day, End Month, End Day, and Delivery Days.
- The Add Row button will add another row to the Calendar Days table.
- The Delete button on the row will remove the row from the table. The first entry in the table can not be removed.
- Input information will be used with the Last Delivery Date to determine when the next delivery is due.
- Will Call

- K-Factor – Not required.
- Last Delivery Date – Select the last date of delivery from the calendar that will determine with the next delivery date is due.
- Last Delivery Gauge – Input the amount on the gauge from the last delivery.
- Last Delivery Amount – Enter the amount from the last delivery.
- Last Delivery Truck Ticket – Enter the Truck Ticket number from the last delivery.
- Update K-Factor – Optionally select to update the K-Factor.
- Scheduled Delivery
Pricing

- Default Terms – Choose from terms set up in Agvance Windows from the drop-down.
- State Tax Code – Select the state from the drop-down to apply the appropriate State Tax Codes.
- Adjustment Tax Code – Adjustments to the tax codes can be selected from the drop-down.
- Budget Billing Info – If Use Budget Billing checkbox is selected, Cycle, Amount ($), and Add Product will be visible.
- Use Budget Billing – This checkbox controls the visibility of additional fields seen below.
- Cycle will be blank but fillable and Amount will default to $0.00 when adding a Tank or optionally edit the Cycle and Amount if editing a Tank. Both fields are required when Use Budget Billing is checked.
- Budget Billing Product – Defaults from Setup / Preferences in Agvance Windows or the Tank Profile section in Energy Force, but may be changed if necessary. This Product is used when posting Budget Bills.
- Can be replaced by selecting the Change Product button, which will open the Product Selection overlay.
- If no preference is set up, the Add Product button will be visible and required.
- Use Budget Billing – This checkbox controls the visibility of additional fields seen below.
- Rent / Lease – Defaults to Owned. If changed to Rent or Lease, additional fields display for the section.

- Ownership – Choose from Owned, Rent, or Lease.
- Add Product – Select to choose a Product for the Tank.
- Cycle – Default value is blank but is fillable and a required field.
- Amount ($) – Defaults to $0.00.
- Default Terms – Choose from available terms in the drop-down.
- Begin Date – Select the beginning date from the date picker.
- End Date – Select the ending date from the date picker.
- Lease Amount ($) – Input the lease amount.
- Lease Payments ($) – Enter lease payment amount.
- Net Lease Balance ($) – Enter the current Net Lease Balance.
- Payoff Amount ($) – Enter the payoff amount.
- Tank Cost ($) – Enter the Tank cost.
- Depreciation Amount ($) – Enter a depreciation amount for the Tank.
- Accumulated Depreciation ($) – If the depreciation amount has accumulated, enter that value.
- Net Tank Value ($) – Enter the net value for the Tank.
- Rent/Lease State Tax Code – Select the applicable code from the drop-down.
- Rent/Lease Adjustment Tax Code – Select the applicable code from the drop-down.

Monitors
Tank records include a dedicated Monitor section, making it easy to view monitor status, most recent readings, and current tank percentages. Tanks without a monitor will clearly indicate that no monitor is assigned. Agvance SKY Admin user permission is required to access Maintenance / Monitors to set up Monitors in inventory. See the Monitors tab on Maintenance - Agvance SKY Energy to add Monitors to inventory.
The Monitor section on all Tank pages show monitor details assigned to the tank. When current monitor data is available, it will be displayed in this section. If a monitor has not reported within the configured tolerance period, a warning indicator is displayed and current % level calculations automatically fall back to K-Factor estimate if the tank is set up for one.

- When adding/editing or viewing a Tank, if there is no monitor inventory set up or readings in Agvance Windows via API for a tank, then the option to add a monitor is disabled.
- Navigating to the Edit Tank page, the Monitor section displays No Monitors available from Inventory. Manage in the Maintenance Monitors area.
- When there is no Monitor inventory set up in Agvance but monitor readings are coming into Agvance via API integration setup for a tank, on the View and Edit Tank page the grid displays Monitor details being returned. These details include the Last Read Date and Last Percentage and the text below states No Monitors available from Inventory. Manage in the Maintenance Monitors area.
- If a Monitor has not had a read within a set timeframe a red indicator appears after Last Read Date/Time and upon hover will state Monitor reading has not been communicated for over (input #) days. See Tank Monitor Readings.
- When there is Monitor inventory set up in Agvance and monitor readings are coming into Agvance via API integration setup for a tank, on the View and Edit Tank page the grid displays Monitor details being returned. These details include the Last Read Date and Last Percentage.

- When there is Monitor inventory set up in Agvance, on the Add or Edit Tank page, selecting + Add Monitor From Inventory will open the Monitor search overlay. Only monitors with the Available status that are not associated with another tank will be displayed. Only 1 Monitor may be selected.

- When Monitor inventory is set up in Agvance but no monitor readings are coming into Agvance via API integration setup for this tank, on the View and Edit Tank page, the grid displays Monitor details. These details include Serial Number, Manufacturer, and Manufacturer Date.

- Monitor inventory assigned to a tank and monitor readings are coming into Agvance via API integration setup for a tank, on the View and Edit Tank page the grid displays all Monitor details. These details include Serial Number, Manufacturer, Manufacturer Date, Last Read Date, and Last Percentage.


Regulators
On the Tank Information page, Tanks without an assigned regulator display a simple No Regulator assigned. message, providing better visibility into tank setup.

On the Add or Edit Tank page, selecting + Add Regulator will open the Regulator Search overlay. Only Regulators that are not currently associated with a Tank will be displayed in the table. Multiple Regulators may be selected.
Regulator information includes the Regulator ID, Serial Number, Model, and Manufacturer.
Selecting Delete removes the Regulator from the Add Tank form and + Add Regulator displays.
Note: When Regulators are not set up or available the + Add Regulator button shows as disabled and the text below states No Regulators available from Inventory. To manage Regulator Inventory utilize Agvance Windows.
User Defined

User Defined fields set in Agvance Windows can also be edited within Agvance SKY Energy. These fields can consist of up to four date pickers, four text inputs, and four checkboxes. Users may also define Classifications.
Saving or Canceling
Selecting Save New Tank will save the tank and route back to the Tanks list page. A validation banner at the bottom of the screen indicates the Tank has successfully been saved.
- If any required inputs are empty when Save New Tank is selected, the validation banner will display at the top of the page, below the header, calling attention to required inputs.
- Empty required inputs will also show in the Error state.
- The Serial Number will be validated to make sure that an existing Tank does not already have the same value.
- The validation banner and error state of inputs will display until Save New Tank is selected after entering required content.
Select Cancel to close out and return to the Tanks screen. If any field was populated, a message displays stating the Tank will not be saved. Select Discard & Continue to cancel the Tank or Go Back to return to the Add Tank form.
